13 Jul 2014

Stitch School Lazy Daisy & French Knot

Please remember I have been stitching since age 11 and know basic rules so this is just my own knowledge shared with you all and I hope it will help you onto a stitching journey that lasts. 

Hi There our stitches today are Lazy Daisy and the French Knot, the daisy is a quick flower to master and you can decorate a large area with them and just add stems... The French Knot is good for flower centers and filling to.. Tree branches, flower heads.
For now you can read my satin stitch tutorial for the set up of your hoop, later I will add a new tutorial on the set up and ways of transferring your image to cloth.


Now you have prepared you hoop you need to separate your threads. Holding you six strands please pull them all apart one by one by pulling in an up direction.  Please do not try and split them like a banana.
I have used three strands of cotton for this demonstration and an Embroidery needle.
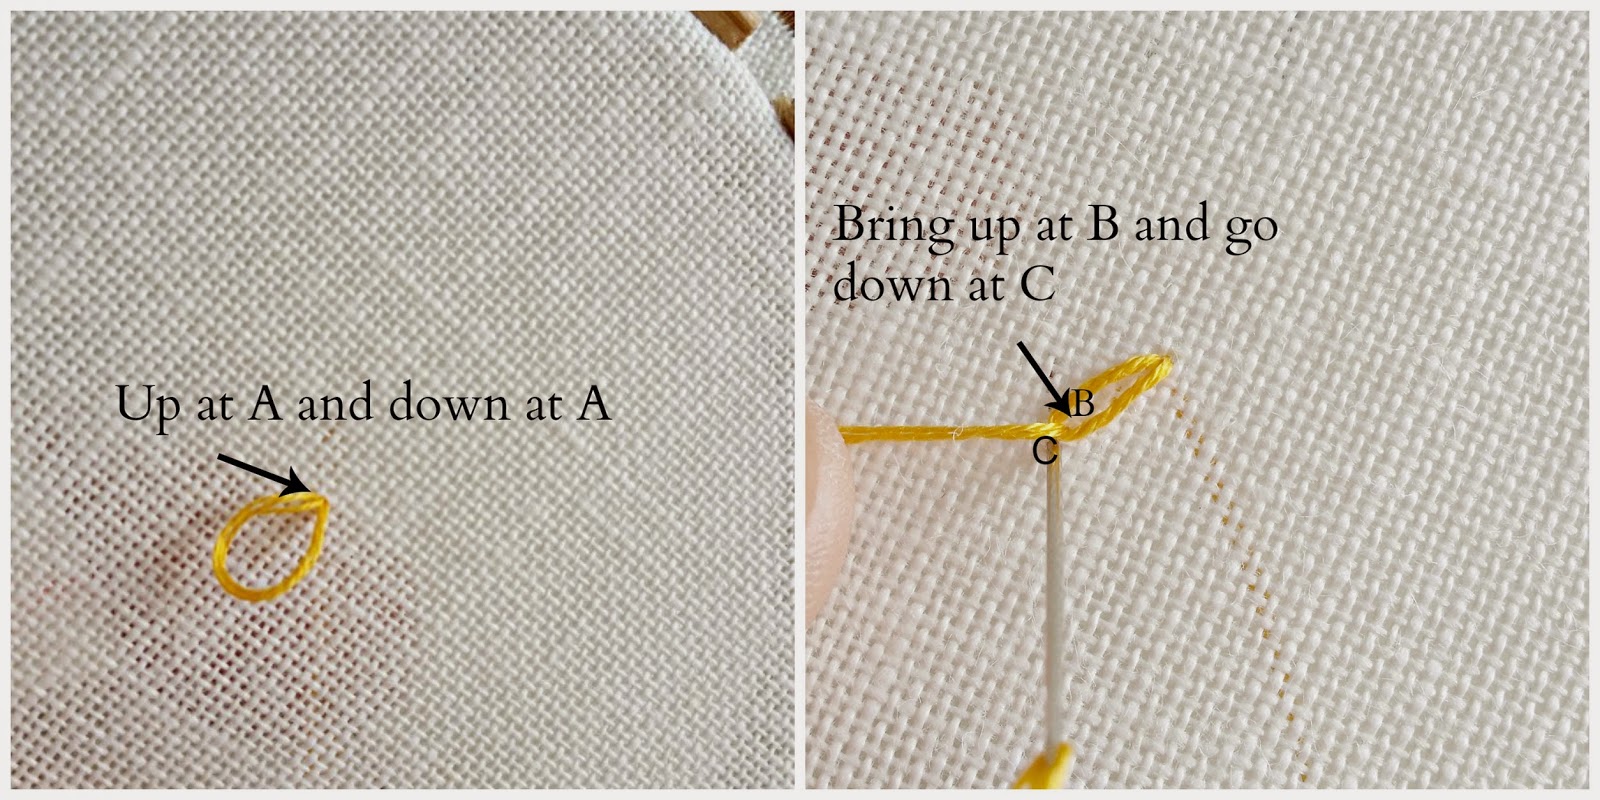


Lazy Daisy Stitch


Put your needle up through the cloth and take it back down at the same point. Bring it up again at B which is inside the flower loop and take it down at C just outside but close as possible to the flower head.
Your first petal.


If you want to you can do the stitch in one monition by going in and out of the cloth and loop
the cotton around the top of the needle, then take the needle down to make the stitch over 
the head of the loop.


Try and keep your flower loops the same size although this will come with practise. 


Mell's ♥


French Knot 


To do the french knot use your Milliners Straw needle again like the bullion Knot it will make it so much easier for the thread to glide down the needle and make the stitch.
Bring your thread up and holding it with your  left hand ( right if left handed) wrap you needle with the cotton.
Again the size of the knot will depend on the amount of strands you  use to form the knot and how many times you wrap the needle.  This is where you can experiment and practice a little. Here I have used all six strands here and wrapped three times.


Once you have wrapped the needle take it back down again where you came up like the lazy daisy stitch.
As you pull the thread from underneath place your thumb on the knot so it keeps its shape and you are left with a little pretty knot to use as you please in your designs. 


Happy Stitching Mell's ♥


Stitch School Bullion Knot

The Bullion Knot & Bullion Loop

You will need a hoop and fabric I have used a 28 count linen for this. Its always best and rule of thumb to have you hoop bound around the bottom with tape to protect your work. You should lay tissue paper over the inside edge to protect your work at the top but for this I will not . Remember to pull all six strands of cotton apart and put back together the amount you want to use, this will help them to lay straight.

The best needle to use for a bullion knot is a  Milliners Straw needle as it is the same size from top to bottom. This means you thread will glide down smoothly. The size knot that you will make will be determined by the amount of stranded cotton you use for thickness also by length of you stitch. (where you come up and go down to begin). I used two strands of thread here.

Milliners Straw's


Lay your fabric in the hoop and pull and tighten the hoop until it makes a drum sound , you are ready to stitch.  Bring the needle up at A now go down at B. This is the point where the length of this stitch will be the length of the bullion knot.. On making the next stitch do not take the needle out of the fabric all of the way, just put the head of the needle out at  C. 
Now wrap the head of the needle with the stranded cotton but keep it in the fabric, you can move the needle along bit by bit. I have wrapped the thread around here 8 times.


Now you have wrapped your thread hold down the knot lightly and gently pull the needle all the way through easing your thread over it and as it comes through at the end gently pull all the way through.


Your first Bullion Knot


A Larger Knot in Blue with Six strands of thread.

I have left a bigger distance between A and B this time.


I have used six strands of cotton and wrapped it 14 times.


THE FINISHED KNOT


BULLION LOOPS


THE BULLION LOOP IS MADE IN THE SAME WAY AS THE KNOT BUT THE DISTANCE BETWEEN IS SMALL AND THE AMOUNT YOU WRAP WILL MAKE THE LOOP. 


THIS HAS BEEN WRAPPED 35 TIMES


FOLDED OVER AND THE NEEDLE PASSED BACK DOWN THROUGH THE CLOTH


THE BULLION LOOP CAN BE USED TO MAKE FLOWER PETALS,  EDGING AND LOTS MORE


THANK YOU FOR TAKING THE TIME TO STITCH WITH ME I DO HOPE THIS WILL HELP .
IF YOU HAVE ANY QUESTION PLEASE ASK.
MELL'S ♥